
How to Use Azure Sentinel for Proactive Threat Hunting: A Complete Guide to Strengthen Your Security

Introduction
In the rapidly evolving world of cybersecurity, staying one step ahead of threats is crucial. Azure Sentinel, Microsoft’s scalable, cloud-native SIEM (Security Information and Event Management) and SOAR (Security Orchestration, Automated Response) solution, empowers organizations to proactively hunt and respond to threats. This guide dives into how to leverage Azure Sentinel to bolster your organization’s security posture through comprehensive threat detection, intelligent insights, and integrated response mechanisms.
Setting Up Azure Sentinel
Getting Started: Begin by connecting Azure Sentinel to your Azure subscription. Navigate to the Azure portal, find Azure Sentinel under “Security,” and create a new instance. Connect Azure Sentinel to your data sources, which can include Azure services, on-premises data, and other cloud environments.
Data Connectors: Azure Sentinel offers a wide array of data connectors for seamless integration with various data sources such as Microsoft 365, Azure AD, and third-party solutions like AWS Cloud Trail or Cisco ASA. Activating these connectors involves a few simple clicks, and each connector comes with specific instructions to guide you through the setup process.
Integrating with Other Azure Services
Leverage Azure AD for Identity Threats: Integrating Azure AD with Sentinel allows you to monitor and analyze identity-related activities. This setup is crucial for identifying potential threats such as unusual sign-in activities or attempts to escalate privileges.
Integrate with Azure Security Center: By connecting Azure Sentinel with Azure Security Center, you enhance your visibility into security alerts across your Azure subscriptions and hybrid environments. This integration enables Sentinel to aggregate and analyze security data from various sources, providing a unified threat detection and response strategy.
Developing Custom Alert Rules
Rule Creation: In the Azure Sentinel dashboard, navigate to the “Analytics” section to create custom alert rules. These rules are based on KQL (Kusto Query Language) queries that run across your collected data.
Scenario-Based Rule Development: For example, to detect potential ransomware activity, you could create a rule that triggers alerts for rapid, high-volume file modifications or unauthorized access to backup systems.
Automated Response: Use playbooks in Azure Sentinel to automate responses to common threats. For instance, if an alert rule detects a suspected data exfiltration attempt, a playbook could automatically isolate affected machines and alert the security team.
Case Studies and Hypothetical Scenarios
Case Study: Detecting Insider Threats
- Scenario: An employee accesses confidential files at unusual hours and downloads large volumes of data.
- Detection and Response: Azure Sentinel’s integration with Azure AD and anomaly detection algorithms identifies the suspicious activity. A playbook automatically revokes the user’s access permissions and alerts the security team to investigate further.
Hypothetical Scenario: Stopping a Ransomware Attack
- Situation: Azure Sentinel detects abnormal encryption-related activities within the network, indicative of a ransomware attack.
- Action: Sentinel’s custom rules trigger an automated playbook that immediately isolates the affected systems, preserving critical data and preventing the spread of ransomware. The security team is notified simultaneously to begin remediation processes.
Azure Sentinel is a powerful tool for organizations aiming to adopt a proactive stance against cyber threats. By setting up Sentinel, integrating it with other Azure services, and utilizing custom alert rules, businesses can not only detect but also respond to threats swiftly and effectively. As cyber threats continue to evolve, tools like Azure Sentinel are essential in the arsenal of any security team looking to enhance their defensive strategies.
This guide serves as a starting point for security analysts and advanced users to deepen their understanding of SIEM capabilities and refine their incident response strategies using Azure Sentinel.
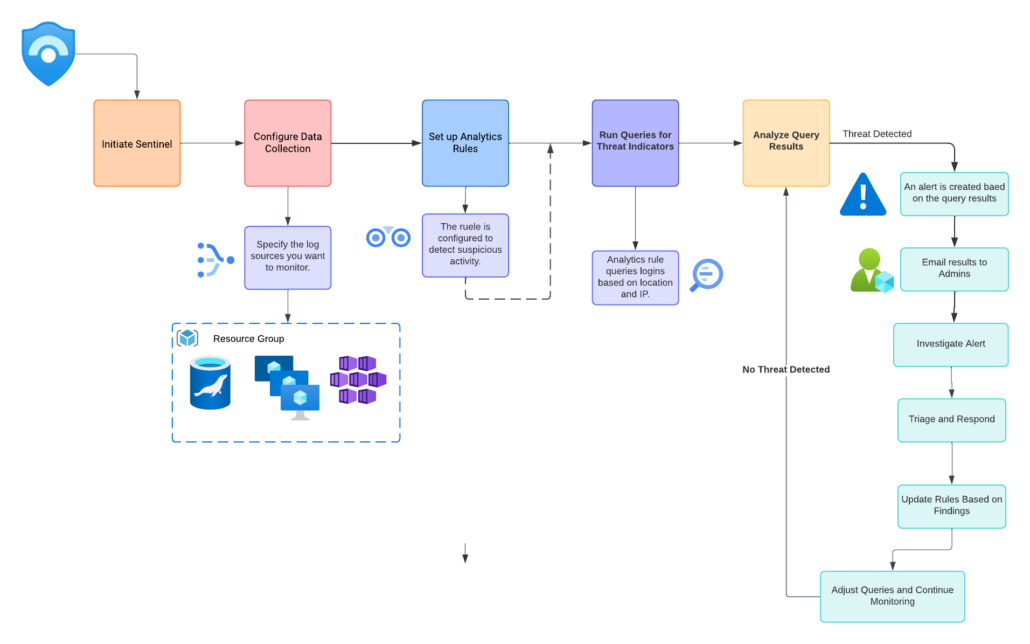
- Initiate Sentinel: Start by setting up Azure Sentinel on your network.
- Configure Data Collection: Establish data collection protocols to gather security data.
- Set Up Analytics Rules: Implement rules that will trigger alerts based on specific threat indicators.
- Run Queries for Threat Indicators: Execute queries to search for signs of potential threats within the collected data.
- Analyze Query Results: Review the outcomes of the queries to identify any anomalies.
- Threat Detection:
- If a threat is detected, generate an alert.
- If no threat is detected, adjust queries and continue monitoring.
- Investigate Alert: Conduct a detailed investigation if an alert is raised.
- Triage and Respond: Determine the severity of the threat and respond appropriately.
- Update Rules Based on Findings: Refine analytics rules based on insights gained from investigations to improve future threat detection.
Further Your Knowledge with These Resources
To dive deeper into Azure Sentinel and enhance your skills in proactive threat hunting, check out these essential resources:
- Azure Sentinel Official Documentation: Get comprehensive technical guidelines and detailed documentation directly from Microsoft. Explore Azure Sentinel Documentation
- Kusto Query Language (KQL) Basics: Master the query language used in Azure Sentinel for creating powerful custom alert rules. Learn KQL for Azure Services
- Microsoft Cybersecurity Reference Architectures: Understand how Azure Sentinel integrates into Microsoft’s broader cybersecurity solutions. View Microsoft Cybersecurity Architectures
- Microsoft Security Blog: Stay updated with the latest insights and updates on Azure Sentinel and other Microsoft security tools. Visit the Microsoft Security Blog


Leave a Reply
Want to join the discussion?Feel free to contribute!